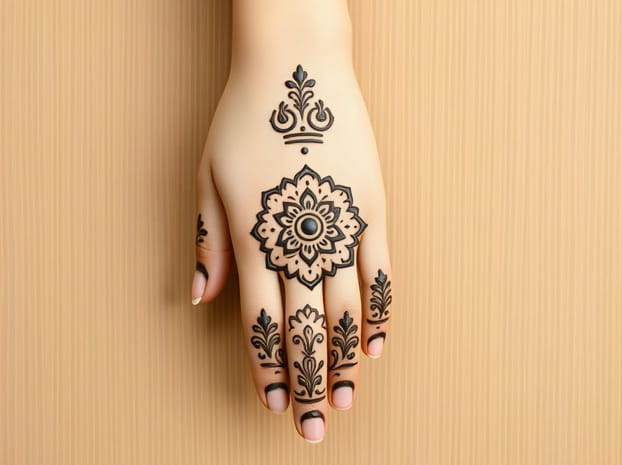
Easy Mehndi Design Front Hand
Applying mehndi, also known as henna, on the front hand is a traditional and artistic way to adorn the skin for celebrations, festivals, or everyday beauty. Many people are drawn to mehndi because it combines cultural significance with creativity, allowing individuals to express themselves through intricate patterns and designs. For beginners and enthusiasts alike, creating easy mehndi designs for the front hand can be both satisfying and enjoyable. These designs range from simple floral motifs to geometric patterns, ensuring that everyone can find a style that suits their skill level and occasion.
Understanding Mehndi and Its Importance
Mehndi is a natural dye made from the leaves of the henna plant. It has been used for centuries across South Asia, the Middle East, and North Africa for body art, weddings, and religious ceremonies. Applying mehndi is not only a decorative art but also carries cultural symbolism, representing joy, beauty, and auspiciousness. Traditionally, the front hand is one of the most popular areas for mehndi application, as it is visible and can showcase detailed designs effectively. Knowing the cultural background enhances the appreciation of the art and inspires creativity when crafting new patterns.
Fun Fact 1 Healing Properties
Henna is known for its cooling and natural antibacterial properties. Apart from its decorative use, applying mehndi can provide a soothing effect on the skin, especially in hot climates.
Essential Tools for Easy Mehndi Design
To create easy mehndi designs on the front hand, having the right tools is essential. A cone filled with henna paste is the most common and convenient method for application. Beginners may also use a fine-tipped bottle or even a toothpick for precise lines. Additionally, having tissue paper, lemon-sugar mixture, and tape can help in achieving clean and long-lasting designs. With these basic tools, anyone can start creating beautiful mehndi designs without needing professional assistance.
Fun Fact 2 Homemade Henna Cones
Many enthusiasts make their own henna cones at home using plastic sheets and freshly prepared henna paste. This allows customization of thickness and flow, which is particularly useful for creating detailed front-hand designs.
Basic Techniques for Front Hand Mehndi
For beginners, it is helpful to understand some basic techniques before attempting full designs. Start with simple lines, dots, and curves. These elements can be combined to form flowers, leaves, paisleys, and geometric shapes. Working from the center of the palm outward or from the wrist to fingers ensures a balanced composition. Keeping the hand relaxed and steady is important, as it affects the smoothness of lines and symmetry of the design. Practicing these techniques on paper or plastic sheets before applying to the skin can improve confidence and precision.
Fun Fact 3 Starting Small
Even a few dots and simple floral motifs can create an attractive design. Starting with small patterns allows beginners to gradually expand their skills without feeling overwhelmed.
Easy Mehndi Design Ideas for the Front Hand
There are numerous simple mehndi designs suitable for the front hand. Here are a few popular options
- Floral MotifsFlowers with leaves and small spirals are easy to draw and look elegant on the palm.
- Paisley PatternsSingle or repeated paisleys along the fingers or palm create a traditional look.
- Geometric ShapesSquares, triangles, and dots arranged symmetrically give a modern aesthetic.
- Finger DesignsSimple lines, dots, or small floral tips on each finger enhance the overall design without being complicated.
- Minimalist DesignsA single motif in the center of the palm with light accents on fingers is perfect for everyday wear.
Fun Fact 4 Combining Patterns
Combining small elements like dots, leaves, and swirls can create complex-looking designs while remaining simple to execute. This technique allows easy customization of mehndi art for the front hand.
Step-by-Step Process for an Easy Front Hand Design
Creating an easy mehndi design involves a few clear steps
- PreparationWash and dry the hand to remove oils or lotions that may affect henna staining.
- Basic OutlineStart by lightly outlining your main design, such as a flower or paisley in the center of the palm.
- Adding DetailsUse dots, lines, and leaves to enhance the main pattern. Focus on symmetry and balance between the fingers and palm.
- ShadingFill certain areas with hatching or small dots to create texture and depth.
- Drying and CareAllow the henna to dry completely. Applying a lemon-sugar mixture can help darken the stain. Avoid washing the hand for several hours for a rich color.
Fun Fact 5 Natural Darkening
Henna designs naturally darken over 24 to 48 hours. The final color often appears darker than when the paste initially dries, creating a rich, lasting pattern.
Tips for Making Mehndi Design Easy
Several tips can help beginners create easy and beautiful mehndi designs on the front hand
- Practice simple shapes on paper first to gain confidence.
- Keep the cone or applicator at a consistent angle for smooth lines.
- Work slowly and steadily; patience improves precision.
- Start with one section of the hand, like the palm, before moving to fingers.
- Experiment with combining different motifs for unique designs.
Fun Fact 6 Patience is Key
Even simple mehndi designs can look elegant when applied with care. Rushing can lead to smudges, so patience and practice are essential for neat and professional-looking patterns.
Occasions for Easy Front Hand Mehndi
Easy mehndi designs are suitable for a variety of occasions. For festivals like Diwali, Eid, or Karva Chauth, simple floral and paisley patterns add a festive touch. For weddings, bridesmaids or family members can adorn their hands with minimalist or moderate designs that complement elaborate bridal mehndi. Even for casual wear, small and easy designs on the front hand can enhance personal style and cultural expression.
Fun Fact 7 Versatility of Simple Designs
Simple front-hand mehndi designs can be scaled up or combined with other patterns for more intricate works. This makes them versatile for both casual and formal occasions.
Maintaining and Enhancing Mehndi Color
To ensure that easy mehndi designs last longer and appear darker, follow some care tips. Avoid washing the hand with soap for a few hours after application. Applying a lemon-sugar solution or wrapping the design with a light cloth can intensify the stain. Over the next couple of days, the henna develops a deeper reddish-brown color. Moisturizing with natural oils like coconut or mustard oil helps preserve the design and prevents fading. With proper care, even simple designs can remain beautiful for up to two weeks.
Fun Fact 8 Long-Lasting Stains
Henna naturally fades over time as the skin exfoliates, but proper aftercare can extend the life of the design, making even easy patterns look vibrant and fresh for days.
Creating easy mehndi designs for the front hand is a delightful way to explore art, culture, and personal expression. With basic tools, simple techniques, and a little practice, anyone can achieve elegant and attractive designs. Starting with simple motifs like flowers, paisleys, and geometric patterns allows beginners to gain confidence and gradually improve their skills. Whether for festivals, weddings, or casual adornment, easy mehndi designs enhance the beauty of the hands while connecting to a rich cultural tradition. By practicing regularly, experimenting with patterns, and following proper aftercare, you can enjoy stunning front-hand mehndi designs that are simple, elegant, and long-lasting.