Diy Louver Kit Bunnings
Installing louvers in your home can dramatically improve ventilation, privacy, and aesthetic appeal, and doing it yourself can save both time and money. A DIY louver kit from Bunnings offers homeowners an accessible solution, combining convenience with the flexibility to customize according to personal preferences and home requirements. These kits are designed for ease of assembly and installation, making them a popular choice among those looking to enhance their living space without professional help. Whether for windows, doors, or outdoor structures, a DIY louver kit allows you to achieve a polished and functional finish while learning valuable skills in the process. Understanding the components, installation process, and benefits of these kits is essential for anyone considering this home improvement project.
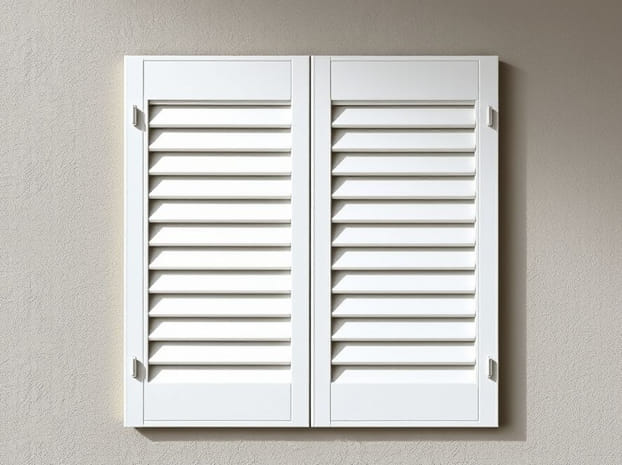
Understanding DIY Louver Kits
DIY louver kits typically include pre-cut slats, mounting brackets, screws, and sometimes adjustment mechanisms to control the angle of the louvers. The primary purpose of louvers is to allow airflow while restricting direct sunlight or unwanted views. They are commonly used in windows, doors, garden structures, and ventilation systems. Bunnings offers a range of louver kits suitable for different materials including wood, aluminum, and PVC, giving homeowners multiple options depending on durability, maintenance, and design preferences.
Key Components of a Louver Kit
- SlatsThese are the horizontal or angled panels that control light and airflow.
- FrameProvides the structure for the louvers, ensuring stability and alignment.
- Mounting HardwareScrews, brackets, and clips needed for installation.
- Adjustment MechanismSome kits include a lever or motorized option to tilt the slats.
Benefits of Installing Louvers
Using a louver system in your home or outdoor spaces offers several advantages. Properly installed louvers improve both functionality and aesthetic appeal.
Enhanced Ventilation
Louvers allow air to flow freely into a space while minimizing direct sunlight and heat. This natural ventilation can reduce reliance on air conditioning, lowering energy costs and improving indoor air quality. Adjustable louvers offer control over airflow intensity, helping maintain a comfortable environment throughout the day.
Privacy Control
Louvers are effective in limiting visibility from outside, offering homeowners privacy without completely blocking natural light. This is especially useful in urban areas or for rooms facing streets or neighboring properties. Adjustable slats allow you to balance light, airflow, and privacy according to preference.
Protection from Sunlight and Rain
Properly angled louvers can reduce direct sunlight, preventing excessive heat and fading of furniture and flooring. Some designs also help in diverting light rain, protecting interiors and outdoor areas without the need for permanent fixtures or shading structures.
Step-by-Step Guide to Installing a DIY Louver Kit
Installing a louver kit from Bunnings requires preparation, attention to detail, and basic tools. Here is a general guide to ensure successful installation
Step 1 Measure and Prepare the Space
Accurate measurements are essential. Measure the height and width of the area where the louvers will be installed. Mark reference points for the frame to ensure level alignment. Clear the installation area of obstacles and debris to make the process easier.
Step 2 Assemble the Frame
Most DIY kits provide pre-cut pieces for the frame. Follow the instructions to assemble the frame using the included screws and brackets. Ensure the corners are square and the frame is level before securing it in place. A well-assembled frame is crucial for the proper functioning of the louvers.
Step 3 Attach the Slats
Install the slats according to the kit instructions. Many kits allow you to snap slats into the frame or secure them with screws. Maintain even spacing between slats to ensure consistent airflow and aesthetic appeal. If your kit includes an adjustment mechanism, attach it according to the manufacturer’s directions.
Step 4 Final Adjustments
Once all slats are in place, test the adjustment mechanism to ensure smooth operation. Make any necessary alignment corrections to maintain even spacing and proper tilting. Double-check that all screws and brackets are tightly secured.
Tips for a Successful DIY Louver Installation
- Use a spirit level to ensure horizontal alignment of the frame and slats.
- Wear safety gloves and eye protection while handling tools and components.
- Follow the manufacturer’s instructions carefully to avoid damaging materials.
- Pre-drill holes for screws in wooden frames to prevent splitting.
- Consider painting or finishing wooden louvers before installation to save time and protect against weather.
Common Mistakes to Avoid
Even a simple DIY project can face challenges if proper care is not taken. Common mistakes include
- Incorrect measurements, leading to misaligned frames and uneven slats.
- Forgetting to check the level, which can affect louver function and aesthetics.
- Over-tightening screws, which can warp the frame or strip holes.
- Neglecting to follow the order of assembly, which may require disassembly and rework.
Choosing the Right Louver Kit
When selecting a DIY louver kit from Bunnings, consider the following factors
- MaterialWood offers a natural look but requires maintenance, aluminum is durable and low-maintenance, and PVC is lightweight and water-resistant.
- SizeChoose a kit that fits the intended space with minimal modifications.
- AdjustabilityDecide whether you want fixed slats or adjustable ones for airflow control.
- FinishConsider color and texture to match your home’s aesthetic.
A DIY louver kit from Bunnings provides homeowners with a practical and stylish solution for improving ventilation, privacy, and overall appearance of windows, doors, and outdoor structures. Understanding the components, benefits, and proper installation techniques ensures a successful project, whether for indoor or outdoor spaces. By following step-by-step instructions and avoiding common mistakes, even beginners can achieve professional-looking results. With the right preparation, tools, and attention to detail, installing a DIY louver kit can be a rewarding experience that enhances both the functionality and aesthetics of your home, while giving you the satisfaction of completing a project with your own hands.