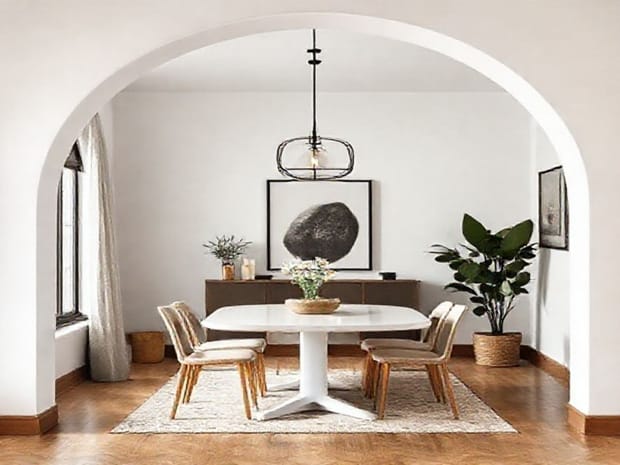
Diy Archway Dining Room
Transforming a dining room can be as simple as adding an archway, a design element that instantly elevates the space and creates a sense of openness and architectural interest. A DIY archway in the dining room is a popular project for homeowners looking to add charm and sophistication without undertaking a full-scale renovation. By framing an entryway or defining the transition between rooms, an archway can enhance the flow of a home while complementing existing décor. This project allows for creativity in materials, finishes, and styles, giving each DIY enthusiast the opportunity to personalize their dining area with a feature that is both functional and visually striking. Whether your home has a modern, traditional, or eclectic style, a carefully designed archway can serve as a stunning focal point that ties the room together.
Planning Your DIY Archway
Before starting any DIY archway project, proper planning is essential. This includes measuring the space, selecting materials, and determining the style of archway that best suits your dining room and home architecture.
Measure and Assess the Space
Begin by measuring the width and height of the doorway or opening where the archway will be installed. Ensure that the dimensions are appropriate for the scale of the room and allow for comfortable passage. Check the surrounding walls and ceiling for any structural elements, wiring, or plumbing that may affect the installation process.
Choose an Archway Style
Archways come in several styles, each with a distinct look
- Round ArchA classic semi-circular design that adds elegance and softness to the space.
- Segmented ArchFeatures a flatter curve, offering a subtle transition between rooms.
- Pointed ArchOften used for more dramatic or Gothic-inspired designs, adding vertical emphasis.
- Contemporary ArchStraight-edged or minimalist curves that suit modern interiors.
Materials and Tools Needed
Selecting the right materials and tools ensures a smoother installation and a professional-looking result. Common materials include wood, MDF, or drywall, while tools vary depending on the chosen material and complexity of the arch.
Materials
- Wood or MDF boards for the arch frame
- Drywall for finishing and covering the frame
- Joint compound and tape for seams
- Sandpaper for smoothing edges
- Paint or stain to match the room décor
- Screws, nails, and wood glue for assembly
Tools
- Miter saw or jigsaw for cutting curves
- Measuring tape and level for accurate installation
- Drill and screwdriver
- Stud finder to locate wall supports
- Paintbrush or roller for finishing
- Clamps to hold pieces during assembly
Constructing the Archway Frame
The archway frame is the backbone of your project. A sturdy frame ensures that the arch is safe, stable, and capable of supporting any decorative elements or finishes.
Cut and Assemble the Frame
Start by cutting the top curved piece of the arch. Using a template or a string to draw the curve on the wood can help achieve a smooth and symmetrical shape. Cut the vertical sides of the arch to match the height of the doorway. Attach the pieces together using screws or wood glue, and check with a level to ensure alignment. Clamps can help hold pieces in place while securing the frame.
Install the Frame
Once assembled, position the frame in the doorway. Secure it to the existing wall studs using screws, making sure it is level and centered. Double-check measurements before permanently fastening to prevent adjustments later. This step provides the foundation for all finishing materials.
Finishing the Archway
Finishing adds the final touches that make the archway blend seamlessly with the dining room. Proper finishing techniques can transform a simple frame into an elegant architectural feature.
Apply Drywall or Paneling
If using drywall, cut pieces to fit the arch curve and sides. Attach with screws or nails and tape the seams. For a wood or MDF arch, you may opt to add molding or trim to enhance the design. Smooth all surfaces with joint compound and sand until even.
Paint or Stain
Choose a paint color or wood stain that complements the existing dining room décor. Neutral tones can highlight the shape without overpowering the space, while bold colors can make the archway a statement feature. Apply multiple coats for a polished finish.
Decorative Enhancements
Once the archway is installed and finished, consider adding decorative elements to enhance its visual appeal. These enhancements can make the dining room feel more inviting and stylish.
- Crown MoldingAdds elegance and a traditional touch to the arch.
- LightingRecessed or pendant lights can highlight the curve and create ambiance.
- Textured FinishesPlaster, beadboard, or wallpaper can add depth and character.
- Architectural DetailsCorbels, trim, or wood carvings can give the archway a custom look.
Tips for a Successful DIY Archway
Achieving a professional-looking archway requires attention to detail and careful execution. Here are some tips for success
- Take accurate measurements and double-check before cutting materials.
- Use a template or guide for smooth and consistent curves.
- Secure the frame firmly to prevent shifting or instability.
- Sand edges and seams thoroughly for a clean finish.
- Allow paint or stain to dry completely between coats.
- Consider the style of your dining room to ensure the archway complements existing décor.
A DIY archway in the dining room is a transformative project that adds architectural interest, elegance, and a sense of openness to your home. By carefully planning the design, selecting appropriate materials, and following proper construction techniques, you can create a durable and visually appealing archway. Whether you prefer a classic round arch, a subtle segmented curve, or a contemporary design, this feature can enhance the flow and character of your dining space. With thoughtful finishing, painting, and decorative touches, a DIY archway becomes a statement piece that elevates both the aesthetic and functionality of the dining room, offering a personalized and professional result for years to come.