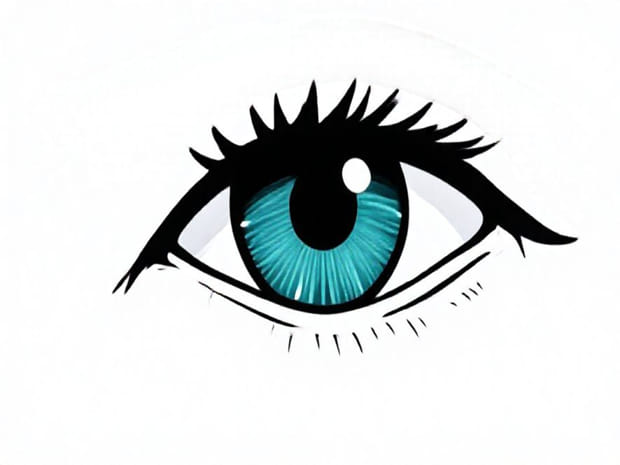
How To Draw An Eyeball
Drawing an eyeball may seem like a simple task at first, but capturing its realistic shape, depth, and expression requires careful observation and technique. The eyeball is one of the most expressive and intricate parts of the human body, and learning to draw it accurately can greatly improve your overall drawing skills. Artists often focus on the eyeball to practice proportions, shading, and reflection, as it combines smooth surfaces, complex textures, and highlights that require attention to detail. Understanding the anatomy and visual nuances of the eye is essential for creating a lifelike and captivating illustration.
Understanding the Structure of an Eyeball
Before starting your drawing, it is important to understand the basic anatomy of an eyeball. The eye is not just a flat circle; it is a spherical shape enclosed by the eyelids. The iris, the colored part, surrounds the pupil, which is the dark center. The sclera is the white part of the eye, and small veins can sometimes be visible on its surface. The cornea adds a slight bulge and transparency, while the reflections on the surface give life to the eyeball. Observing these structural elements carefully helps in creating a realistic and proportionate drawing.
Materials Needed
- Pencil – for initial sketching and shading.
- Eraser – to correct mistakes and refine details.
- Paper – a sketchbook or drawing paper.
- Blending tools – such as a tortillon or cotton swab for smooth shading.
- Optional Colored pencils or pens for adding iris color and highlights.
Step-by-Step Guide to Drawing an Eyeball
Step 1 Draw the Basic Outline
Start by sketching a circle to represent the eyeball. This will serve as the foundation for the rest of the drawing. Add a smaller circle inside for the iris, and another even smaller one for the pupil. Ensure that the pupil is centered within the iris. Lightly draw these shapes to make adjustments easier in the later stages. The basic outline establishes the proportions and placement of the key components.
Step 2 Sketch the Eyelids and Surrounding Area
Next, draw the eyelids around the eyeball. The upper eyelid usually covers part of the iris, while the lower eyelid sits slightly below it. Consider the curvature of the eye when sketching these lines. You can also include the tear duct in the inner corner to add realism. Drawing the surrounding area, such as the eyebrow or subtle folds of skin, can enhance the context and make the eye appear more natural.
Step 3 Add Detail to the Iris and Pupil
The iris contains intricate patterns that give the eye its unique appearance. Use curved lines radiating outward from the pupil to create these textures. Add shading to the pupil, making it the darkest part of the eye. Gradually build up the depth of the iris with light strokes, and consider adding subtle highlights to suggest reflection. Paying attention to these details will make the eye look lively and realistic.
Step 4 Shade the Sclera and Eyelids
The sclera, or white part of the eye, is not purely white. Apply gentle shading to suggest roundness and depth. Add shadows under the upper eyelid to indicate the curvature of the eye and the way light falls. Blend the shading smoothly for a natural appearance. Shadows on the eyelids and around the eye help in giving the eyeball a three-dimensional effect.
Step 5 Highlight and Reflection
Reflections on the eye bring it to life. Identify the light source and leave small areas of the pupil and cornea white to indicate reflection. You can also add subtle highlights on the iris to enhance the texture. For more realism, lightly sketch the tear line along the lower eyelid. Highlights and reflections are crucial to making the eyeball appear wet and lifelike rather than flat and static.
Tips for Drawing a Realistic Eyeball
- Always start with light pencil lines to allow for corrections.
- Observe real eyes or reference photos to capture accurate proportions and textures.
- Blend shading gently to achieve smooth transitions, especially on the sclera and eyelids.
- Pay attention to the curvature of the eyeball; it is spherical, not flat.
- Use contrasting values for the pupil, iris, and sclera to create depth and realism.
Common Mistakes to Avoid
- Drawing the iris and pupil too large or too small compared to the eyeball.
- Ignoring the spherical shape, which can make the eye look flat.
- Overlooking subtle shadows on the sclera or eyelids, which reduces realism.
- Placing highlights incorrectly, which can make the eye appear unnatural.
- Using harsh lines for the iris instead of soft textures for a more realistic look.
Practice and Variations
After mastering a basic eyeball, try drawing different types of eyes, such as wide-open eyes, squinting eyes, or eyes from various angles. Experiment with different emotions, lighting conditions, and colored irises. Adding eyelashes, eyebrows, and surrounding facial features will help integrate the eye into a complete face. Practicing these variations strengthens observation skills, hand-eye coordination, and attention to detail, allowing you to create more expressive and lifelike eyes over time.
Learning how to draw an eyeball is a rewarding exercise that enhances your overall drawing ability. By understanding the anatomy, proportions, and key details, you can create realistic and expressive eyes. Following steps such as sketching the outline, adding eyelids, detailing the iris and pupil, shading the sclera, and including highlights will help produce a compelling and three-dimensional eye. With patience, practice, and careful observation, anyone can develop the skill to draw lifelike eyeballs, ultimately improving their artistic confidence and mastery over complex forms.